Site Navigation
To make changes to your Site Navigation menus:

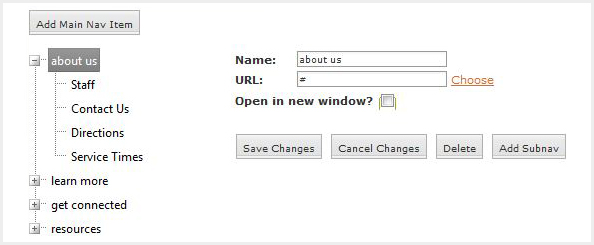
From the Admin Console, choose Site Administration > Site Navigation. You will see a list of items, which represent the main or parent navigation items at the top of your website. You can click on the plus sign next to each one to see the list of sub menus for that item.
1. To add a new main navigation item, select the "add main nav item" button at the top. If this button is not available, please contact our Care team to increase the maximum number of navigation items.
2. The following items can be changed for the main and sub menu items:
- Name: The name of this navigation option, as it should appear on the screen.
- URL: The target location of the link. This URL can be an Absolute link or a Relative link.
- Open in a new window: If you would like the target link to open in a new window, select the check box for this option. This is particularly useful if you are pointing to a third-party site.
absolute: http://care.siteorganic.com/pages/page.asp?page_id=178356
relative: /pages/page.asp?page_id=178356
3. To add a new sub menu item, right-click on the parent navigation item and select the "new subnav" option.
4. Change the order of your navigation by dragging and dropping menu items into a new position.
5. To remove a menu item, click on the item name and select the "delete" button in the center of the screen.
6. Whenever you make changes to any area of your navigation menu, it's important that you click the "Save" button. Changes will not be stored unless you Save.